Showing posts with label crafts. Show all posts

Monday, January 17, 2011

inspiration- feeling summery

i'm not planning a wedding...
i just love looking at party decorations <3
makes me happy!


Sunday, January 9, 2011

animal terrariums

my newest little terrariums.


this one [below] was made for my little brother, jake.
He had a stuffed animal named bobo, turtle.. carried it everywhere he went..
i think he was abandoned at some hotel...


this one [below] was personalized for my lil sister, molly-
she had a plastic iguana named kevin that she brought everywhere.
not sure where kevin ever ended up.. but here is his child.

p.s. cannot waittt to get a new camera!
sorry for the crap photos :(

Monday, December 20, 2010

holiday terrarium ornaments


these little guys make great christmas presents :)

Friday, September 10, 2010

Sunday, August 1, 2010

nature projects!


.. and by nature I mean city scraps.


these cement blocks were found in an alley way-
and flowers were picked in a yard (sorry).
And then i mod podged 'em so they would be pretty forever.

i found a big stick and i love it hanging on my wall..
i attached some feathers..
but i wanna add some knitted scraps.

yes.. this is my saturday night.

Wednesday, June 9, 2010

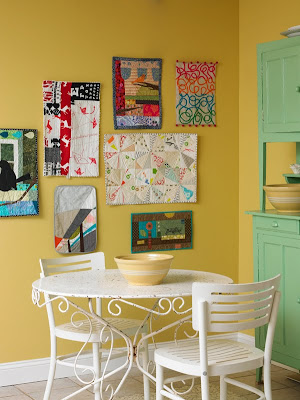
mini quilts !


Why are mini quilts so popular - here are just a few reasons:

1. Quilting can be intimidating - however the small format of the mini quilt means they are a much more attainable goal and the perfect way to gain some quilting confidence

2. Mini Quilts are a great way to use up scraps but also perfect to use your fancy expensive small pieces of fabric

3. Many people don't have the time or patience to finish a large quilt but as they love quilting a mini quilt is an achievable project. They are perfect for those with short attention spans.

4. Mini quilts are the perfect way to hone your quilting skills and test out new techniques


Mini quilts are very popular at the moment - there are flickr doll quilt swaps and mini quilt weekly memes and themes. Quilters and crafters just love showcasing their latest mini project - where they have been able to work through a design concept, or trial a new technique within a short time frame and get feedback from their peers. I blame the internet for the current mini quilt craze - which has turned out to have more longevity than a simple craft fad. As more and more crafters discover the art of quilting and find the satisfaction that can be gained from sewing bits of fabric to other bits of fabric and adding their creative personality to the piece, they are able to grow in confidence and try new things - I just don't see this going away any time too soon.


Monday, April 12, 2010

Do It Yourself Hammock !!


    Weave construction materials—which won’t fade or absorb water—into a truly comfortable spot for lounging.

    1. Cut fencing into two 30×74-inch pieces, trimming the outside squares so that weaving has an edge. Lay out a rectangle with all conduit pieces, attaching elbows to create the “loom.”

    2. Overlap both pieces of snow fencing so squares alternate. Lay on floor in center of conduit frame.

    3. Unroll cording and mark the middle of each spool. The middle will be your starting point for each row of weaving.

    4. Hold the middle of one piece of nylon cording. Loop the middle of cording once around top corner of a 30-inch side of conduit frame. Weave cording in and out of snow fencing going down the long side. Keep tension even.

    5. At bottom, repeat loop around conduit and weave back up. Repeat to make four complete passes.

    6. Tie off end of nylon cording using a standard square knot (Google it for how-to). Leave 3-4 feet of excess to be used later.

    7. Repeat same weaving process on opposite side of snow fencing and in the middle of snow fencing. Weave any additional rows to create desired pattern. Tie all ends with square knots.

    8. Cut remaining nylon cording into two 37-foot pieces. Take the center of each and place one at each center of the short sides of your conduit. Wrap one strand of cording around right side of conduit (to secure fencing and hide conduit) and the other strand around left side of conduit. Tie off with a square knot.

    9. With all cording tied off, create “triangle” shape at each end (to hang hammock from) by pulling excess cording together at each side evenly, holding cording 1-1½ feet from conduit, and tying into a large knot.

    10. Create a second loop knot ½ inch away (so you can hang it). Repeat on the other side.

    11. Unscrew metal conduit elbows from frame and remove 74-inch lengths of conduit.

    12. Find trees and hang your hammock!

    Made by BKLYN DESIGNS

    [click here]

Found on ReadyMade

Saturday, March 6, 2010

i [heart] terrariumssss

amazing terrariums-- because i ♥ terrariumssss!

this place called Litill-- [click here]-- makes unique blown glass. t

hey ship to anywhere and it includes the cute little assortment of desert plans!

they have 6 different designed glass homes you can choose from

and a care guide to take care of your little buddies!

for care guide [click here]


saving up to get one for my birthday :) 2 more weeks (17 days!)

Wednesday, February 24, 2010

what a doll!

Mimi Kirchner makes these awesome cloth dolls!
She uses old fabric and vintage fabric to dress her dolls.
The tattooed dolls are my favorite.. very original.
To see her video [click here]
For her etsy shop [click here]
People like Mimi inspire me to make everything and anything i want to..
Thanks Mimi :)

Monday, February 22, 2010

poop canvas

i'm gonna bust out these in the summer..
try to make some money during the street festival commotion.
there my poops!
(3in x 3in)


Sunday, February 21, 2010

1/6th of little people

this is about 1/6th of the people for my senior thesis class.
i cut them out and
i just felt like scanning them.


Saturday, January 30, 2010

diy- how to make a pillowcase


I made these pillows for a Valentines Day present for my boyfriend.
I picked a King and a Castle because he loves chess.
Needlework is very easy and fun!


I got these pillows at Target.. 2 for $7.99- perfect size for couch or bed pillows.
The pillow cases are from a thrift store 2 for $1.50- washed of course!
First step is measuring out the fit of the fabric.


I made pin marks where the pillows line up to and tried to center it.


Don't sew the pillow together yet!
Next.. find a print out of what you'd like to stitch.
It could be a drawing as well.


Draw an outline in a WASHABLE marker.
Any extra details you want to stitch just draw on the pillowcase.

Next you'll need an embroidery loom.
I actually lucked out and got a pack of them at a thrift store for really cheap.
But any craft store should sell them.
Make sure you pull the fabric tight once you line it all up.


And its as simple as hand stitching all around until the outline doesn't show.
Then I threw it in the wash to take the washable marker off.
You can put your pillow together with either a zipper or an over fold.
I made an over fold in the middle of the back.
Good luck with your crafting!

Friday, January 8, 2010

snow day!

Here's a few pictures from yesterday and some randoms from over winter break.

Considering the downfall of snow.. I had a pretty productive day...


I played with my fish, Solider, Karat, and Dots.


Made some strawberry cupcakes...


Video chatted with my mom- we were both drinking wine, so we cheers'ed!

This is what me and my boy brewed up a few days ago. Looks tasty huh?


This is my lil snowman from Christmas in Cleveland. He has little hairs!
We used berries for the nose and buttons.


I was walking to work and found this amazing
SNOW CASTLE its kinda hard to make out
but you can at least see the tools that were used
( a little yellow shovel)


I love the way snow looks with flash..

I have an obsession with the sky and the formation of clouds. I needed some in my room..

I had to scrape the snow off my car 4 times yesterday.. my car (miko) was a good sport!


I started a little project inspired by ColorMeKatie - I wanted to paint the snow with hearts. I used food coloring, water, and a stencil.